Getting Started
Introduction
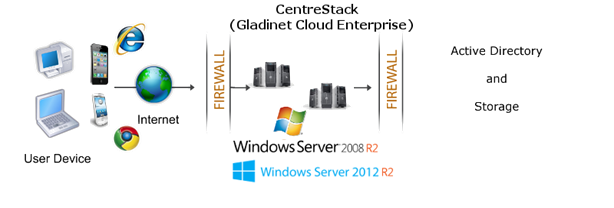
Welcome to the CentreStack Server Installation Guide. This guide describes installation tasks for CentreStack, the enterprise file synchronization and sharing solution. CentreStack includes the CentreStack server, which runs on Windows server platform, client applications for Microsoft Windows, Mac OS X, and mobile clients for the Android and Apple iOS operating systems.
Overview
CentreStack provides value-added services on top of cloud storage services or local storage services. Cloud Storage services include those from OpenStack Swift, Amazon S3 and its compatibles, Windows Azure blob storage, Google Cloud Storage, HP Cloud Storage and many others. Local Storage Services include file server Storage, SAN or NAS storage. CentreStack value-added services can be summarized as Backup, Access, Sync and Share, Identity, Control and Collaboration (BASIC), which is also known as EFSS (Enterprise File Sync and Share) solution.
CentreStack is a cluster of web services built on top of the Microsoft Web Platform. It provides the BASIC value-added services that facilitate online storage access for PCs, Macs, File Servers, Web Browsers, and Mobile Devices.
The services can be deployed in flexible combinations to meet different needs. For example, you can deploy it on-premise as a private cloud; or you can deploy it off-premise in a data center, managed by your managed service provider (MSP); or you can deploy it in Amazon EC2-like environment as virtual-private deployment.
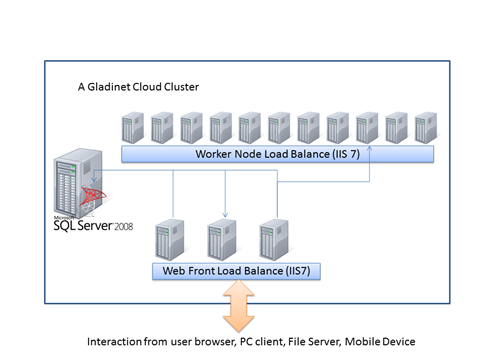
The infrastructure consists of three different Virtual Machines. In the smallest deployment unit, the three different logical nodes can co-exist in one single virtual machine (all-in-one deployment).
Web Node
If you have a hardware load balancer or other kind of load balancing, web node is not required. Instead worker node has web node functionality by default. The Web Node functions include Account Management, Sign-In and Load-Balancing services. Depending on the load, you may need 1 to N such nodes. Normally, we recommend for every 1 web front node, you should have 10+ worker nodes. When you have small deployments you can skip web front nodes and combine them into worker nodes. The installation is the same for web node as well as worker node. If you do not need the Web Nodes there is no need to assign them in the cluster manager web portal.
Example: ACME Corporation deploys two web front nodes ‘node1.acme.com’ and ‘node2.acme.com’. Each node is running a copy of CentreStack, connecting to the same SQL database.
ACME Corporation acquires a domain name (DNS) of cloud.acme.com which can be load balanced to ‘node1.acme.com’ and ‘node2.acme.com’.
When users point their browsers to https://cloud.acme.com, their login page is directed to one of the nodes.
Note
If you have hardware load balancing available, you do not need to use web nodes at all.
Note
Windows 2012 comes with Network Load Balancing (NLB). If you use NLB, you do not need web nodes at all.
Worker Node
The worker node contains services like Web Browser Based File Manager, Storage Service Connectors, and more. Again, additional nodes can be added as the load increases. There is cache information located on each node, therefore, users will have an affinity to a single node once it is assigned.
Database Node
The database contains persistent information for the system. In general, once a user is logged in, database access is no-longer needed for normal operations. If the database is down, most end user operations can continue with cached information (however, users need to access the database at least once to login and cache the information).
Note
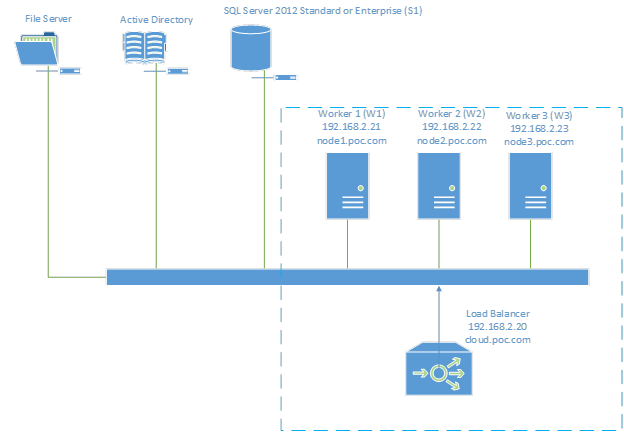
If you have hardware load balancer or other kind of load balancer, you don’t need web front nodes from the above picture.
Deployment Diagram
In this installation guide, we will deploy the solution based on the diagram shown below. If this is the very first time you are install CentreStack, it is recommend that you try the All-In-One Deployment on a single machine first. Once you are more familiar with CentreStack components and its functionality, you can start setting up a production environment similar to the deployment diagram shown below.
In this guide, we use Windows DFS Network File Share as the backend storage. If you are using OpenStack Swift, Amazon S3-Compatible or EMC Atmos storage, they will work as well. The Storage Configuration page will be different for different storage options.
In this installation guide, we will be using Windows Server 2012 R2, which is the recommended Server Operating System for CentreStack solution. (Other supported Operating Systems are Windows 2008 R2 and Windows 2012)
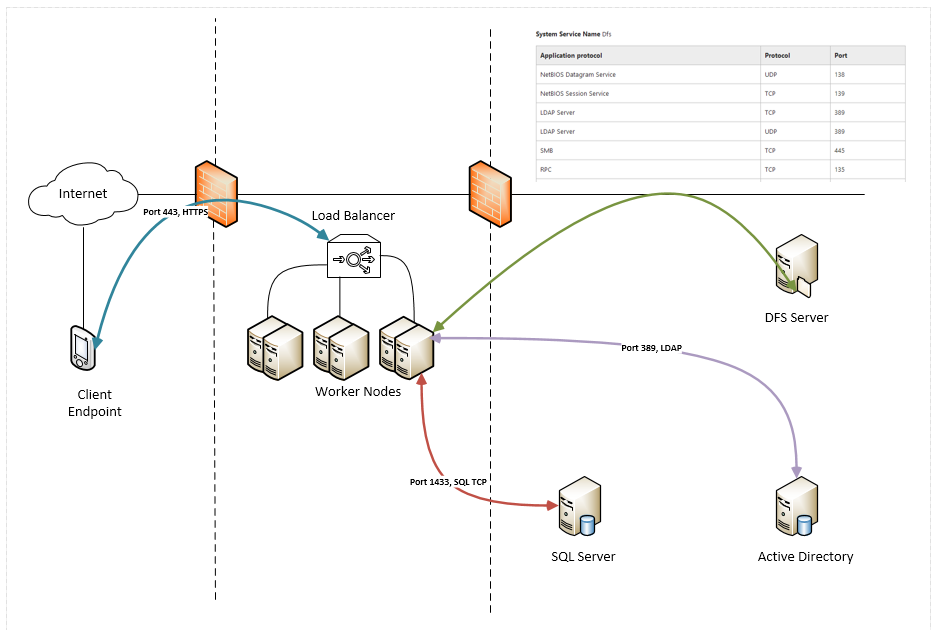
From a different perspective, including the clients and the ports, the diagram may look like this: